Disable Firmware Write Protection – Step-by-Step Guide
Disabling firmware write protection is a crucial step for anyone looking to modify their device’s firmware. By doing so, users open the door to customizations that can enhance performance and capabilities. This process includes disabling hardware write protection and configuring the flash chip to allow software write protection removal. It’s important to note that if you’re a ChromeOS user, setting your device to Developer Mode is a prerequisite before attempting to disable the firmware write protection. Failing to do so not only complicates the flashing of custom firmware but can risk bricking devices, making it essential to follow the right steps cautiously.
To effectively manage firmware restrictions, various alternative methods can be employed to bypass write protection on electronic devices. These methods can involve manipulating hardware components or utilizing specialized software tools to alter the protection status. Users familiar with terms like hardware write protection and software write protection will recognize the significance of each in the process. Specifically for devices running ChromeOS, entering Developer Mode is a vital phase before pursuing actions like removing the write protection screw or bridging jumpers. By understanding the implications of firmware modifications, users can navigate the complexities of their devices with confidence.
Understanding Firmware Write Protection
Firmware write protection plays a vital role in securing a device against unauthorized modifications and potential malware attacks. Predominantly, there are two types of write protection mechanisms in place: hardware and software write protection. Hardware write protection is enforced by physical components within the device, while software write protection is controlled via firmware settings. Understanding these mechanisms is crucial for anyone looking to modify their device’s firmware, particularly for developers and enthusiasts who operate in environments like ChromeOS.
In the context of ChromeOS devices, disabling firmware write protection allows users to perform critical updates, flash custom firmware, or revert to factory settings without hindrance. However, this process must be undertaken with caution as improperly disabling write protection can lead to bricking devices. Therefore, users must be aware of the risks and follow proper procedures to safely disable firmware write protection, ensuring that they are in Developer Mode and ready to proceed.
Steps to Disable Firmware Write Protection
Disabling firmware write protection involves several steps tailored to the specific design of the device. First, it is essential to disable hardware write protection if applicable. This may mean removing a physical write protection screw or bridging a jumper on the motherboard. Once hardware protections are disrupted, users need to access the flash chip register, effectively signaling the device to disable software write protection as well. Following these steps ensures that the firmware’s contents are no longer safeguarded against modifications, giving users full control over their devices.
For many ChromeOS devices, being in Developer Mode is a prerequisite for undertaking any modifications related to firmware protection. This step enables the user to execute necessary commands through the terminal, ensuring the firmware can be accessed and altered as intended. Users should be especially cautious if they are unfamiliar with operating systems and device firmware, as an incorrect action during the writing process could lead to unintentional bricking.
Disabling Hardware Write Protection
Disabling hardware write protection on your ChromeOS device is a straightforward process, though it requires opening the device to some extent. For computers equipped with a write-protect screw, power down and disconnect the external power before accessing the internal components. The removal of the write protection screw allows for subsequent firmware modifications without interference. Once removed, it’s important that users understand they can choose not to replace the screw, effectively rendering the firmware permanently modifiable unless hardware protections are reinstated.
For devices that utilize a jumper configuration instead of a screw, locating the correct pins to bridge is essential. This may involve small tools such as a paperclip or solder for a more secure connection. These processes emphasize the importance of checking specific device guides, as methods to disable hardware write protection can differ significantly between models. Improper handling can lead to complications, making it imperative to proceed with the utmost care.
Steps for Disconnecting the Battery
On CR50 devices, disconnecting the battery is another effective method to disable write protection during firmware modifications. This process starts similarly to other methods: power off the device completely and remove any external power sources. Once you’ve opened the device, seamlessly disconnecting the internal battery from the mainboard allows the user to perform critical updates without the interference of write protection scripts. After modifications, it’s essential to reassemble the device carefully, ensuring all connections are securely restored.
After reconnecting the power, users should attempt to boot the device with an external charger. Operating the device this way assists in swiftly flashing the firmware, as the write protection remains disabled only during this period. Once the updates are complete, it is crucial to power down, disconnect external power, and reconnect the battery properly to avoid operational complications.
Bridging a Jumper for Write Protection
Bridging a jumper for write protection on devices requiring this step can be crucial for firmware modification experiences. Users must open the device and locate the jumper intended for write protection functions. This physical connection can either utilize soldering for a permanent bridge or a simple paperclip for a temporary connection. Fluctuations with the jumper can lead to variability in device performance; thus, it’s advisable to reference specific model guidelines when undertaking this process.
Connectors can be somewhat fragile, so those unfamiliar with hardware manipulations should take particular care. Users should always ensure that the device is powered down before making or breaking any connections. Mismanagement here could lead to unintended bricking of the device, making pre-emptive education on the process fundamental. Be aware of what will happen upon reboot as well; knowing how to restore connections post-modification is essential to proper device functionality.
Using Closed-Case Debugging (CCD) for Firmware Modifications
Closed-Case Debugging (CCD) is a method that requires a specific debug cable, which allows users to bypass typical write protection measures. Upon entering Developer Mode, and accessing the appropriate terminal interface, users can enable CCD and begin firmware alterations. CCD provides a safe environment to work within, helping to mitigate risks associated with untested firmware changes. It’s essential users follow the instructions rigorously to successfully engage CCD.
Once CCD is engaged, the disabling of hardware write protection can be executed. Commands such as ‘wp false’ played through the terminal can invoke changes in device settings that allow full access to firmware modifications. This approach signifies the importance of having the right tools and knowledge to successfully navigate the landscape of write protection and firmware loading. Users should pay immense attention to detail during this process to avoid potential complications that could permanently damage the device.
Avoiding Bricking Your Device During Firmware Changes
One major concern when undertaking hardware modifications is the risk of bricking a device. This is especially true in firmware updates and alterations where verification checks are disabled. For ChromeOS devices using a security chip like the Ti50, failure to disable AP RO firmware verification before flashing can lead to irreversible device states. Users should prioritize understanding their devices’ specifications fully and perform due diligence prior to any modifications.
Recovery techniques exist for those who find their devices unresponsive. Effective reprieves typically involve careful key sequences for different device architectures like Chromebooks or Chromeboxes. Understanding these recovery mechanisms not only equips users with the knowledge needed to potentially restore functionality after an error but also reinforces the importance of safely managing firmware flashing procedures. Always ensure you have reliable solutions at hand to mitigate any unfortunate situations.
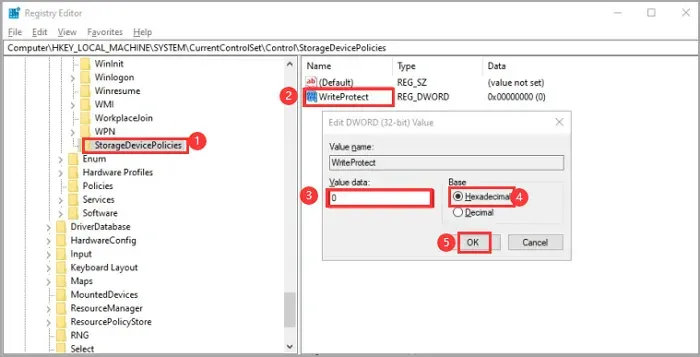
Important Tips for Disabling Software Write Protection
When addressing software write protection, it’s crucial to note that specific scripts can handle this process without users needing to intervene manually. The Firmware Utility Script particularly automates disabling software write protection when flashing firmware. Understanding how these scripts function makes the process seamless, especially for users who may not have much experience handling firmware modifications.
For users interested in the underlying mechanics, they can check the status of the software write protection register with straightforward terminal commands. Engagement with commands like ‘wp-status’ provides insights into the current protection status. Additionally, users looking to control specified ranges for software write protection can adjust these parameters easily with the appropriate terminal inputs. Familiarity with these commands enhances user confidence in executing firmware modifications.
Final Thoughts on Disabling Firmware Write Protection
Disabling firmware write protection remains a complex yet rewarding venture for many ChromeOS users. It opens up possibilities for custom firmware installations, experimental updates, and enhanced control over device functionalities. However, understanding the nuances between hardware and software protections is vital for ensuring a smooth operation. Mistakes made during this process can lead to difficulties, including potential bricking, underlining the importance of meticulous procedure adherence.
As a final note, anyone considering disabling firmware write protection should educate themselves thoroughly on their particular devices and follow comprehensive guides tailored for their specific models. Resources are often made available through developer forums or the manufacturer’s website, providing essential assistance. Equipped with the right knowledge and tools, users can confidently navigate the world of firmware modifications.
Frequently Asked Questions
How do I disable firmware write protection on my device?
To disable firmware write protection, you must first disable hardware write protection, set the flash chip register to remove software write protection, and clear any protected ranges. Make sure your device is in Developer Mode before proceeding.
What should I do if my device has a write protection screw?
If your device has a write-protect screw, power off the device, open it up, and remove the WP screw. You can then reassemble the device without reinserting the screw, as it is no longer needed.
Is it possible to disable software write protection without hardware modifications?
Yes, you can disable software write protection using the Firmware Utility Script automatically without needing to modify hardware. This script manages the write protection settings for you.
What are the steps to remove write protection in ChromeOS Developer Mode?
In ChromeOS Developer Mode, start by disabling the hardware write protection, then use the terminal to access and disable software write protection. Ensure the device has the correct setup for these operations.
How can I unbrick a device that was bricked due to write protection during flashing?
To recover a bricked device, you may need to follow specific button combinations based on the type of device (Chromebook, Chromebox, or Tablet) to temporarily disable RO verification and recover it.
What is the role of the SuzyQ cable in disabling firmware write protection?
A SuzyQ cable is used for closed-case debugging to ensure a proper connection for disabling hardware write protection on ChromeOS devices. It allows you to send commands to modify write protection settings directly.
Can enabling Developer Mode affect my firmware write protection?
Yes, enabling Developer Mode is a prerequisite for disabling firmware write protection, as it allows access to modifications necessary for altering the device’s firmware settings.
What is the difference between hardware write protection and software write protection?
Hardware write protection is a physical mechanism (like a screw or jumper) that prevents firmware changes, whereas software write protection is controlled via the operating system, preventing modifications through software commands.
Why do I need to disable RO verification when flashing custom firmware?
Disabling RO verification is critical for devices with a Ti50 security chip, as failing to do so can temporarily brick your device while flashing unverified firmware.
Are there risks involved in disabling firmware write protection?
Yes, disabling firmware write protection can expose your device to risks including potential corruption of firmware, accidental bricking, and loss of security if not managed properly.
| Method | Steps | Notes |
|---|---|---|
| Removing the Write Protection Screw | 1. Power off the device and disconnect external power. 2. Open the device. 3. Remove the WP screw. 4. Reassemble the device. |
WP screw can be left out. |
Summary
To disable firmware write protection, it is important to follow specific procedures tailored to your device type. Disabling Firmware Write Protection requires disabling the hardware protection and adjusting firmware settings, ensuring that your device’s firmware is unprotected against future changes. This process is crucial for users who wish to flash custom firmware or perform advanced modifications on their devices and varies depending on the specific hardware. Always ensure your device is in Developer Mode and consult the Supported Devices page to find the proper method for your device.
#FirmwareProtection #DisableWriteProtection #BIOSSettings #TechGuide #AdvancedConfiguration